Thank so much for purchasing our DingPost
Please help us by purchasing Extended License if you want to charge end users
DingPost is designed to work on Apache system with mod_rewrite. But you can run with other systems easily, such as nginx, lighttpd, litespeed, ect. by converting htaccess's rewrite rules to other suitable rules of these systems.
Your server must support MySQLi because DingPost only works with it.
DingPost must be operated by an MySQL server, at least 5.5
The module Resell Solutions allows your users to run the script on their own domains, use your services to sell their own plans & prices. So if you want to use this function, you'll need to access your host server & change its configurations, please follow 3 simple steps below:
-
1. Point all domains to your server
Go to your domain control manager; you must need to create A Record to point all custom domains to your server, such as:
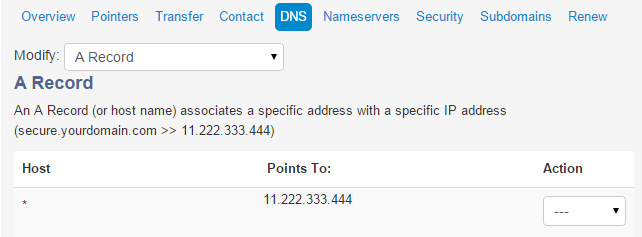
This step requires some hours for updating
-
2. Create a wildcard DNS entry for your domain
Go to your server hosting manager; under site DNS manager, you need to create a wildcard domain entry looks like this:
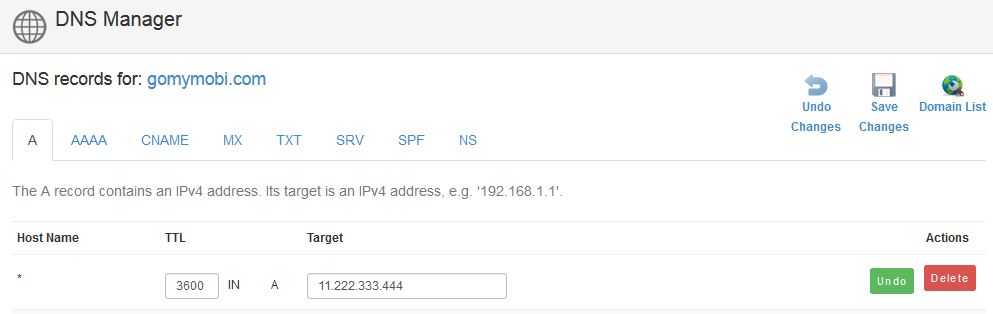
This step requires some hours for updating
-
3. Include this wildcard in vhost configuring file
Finally, in the Apache configuration, you must edit a vhost container (httpd-vhosts.conf) that specifies the wildcard in the ServerAlias directive looks like this:
# DOMAIN: gomymobi.com
<virtualhost *:80>
ServerName www.gomymobi.com
ServerAlias * # accept all custom domains / domains requests
</VirtualHost>
Then, restart Apache to apply new configurations, with command
service httpd restart(on CentOS) orservice apache2 restart(on Ubuntu) .
*** If you are using one of web servers below, please read our simple & quick guides for installation
-
1. Point all domains to your server
Go to this URL (replace by your domain information)
https://your-server-ip-address:8443/smb/dns-zone/add-record/id/d:your-domain-id-number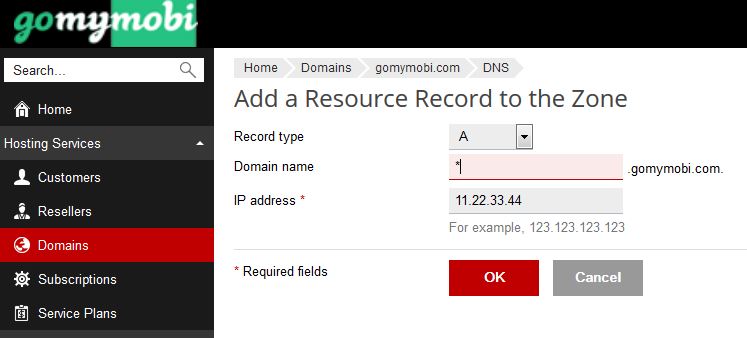
-
2. Include this wildcard in vhost configuring file
Go to this URL
https://your-server-ip-address:8443/smb/web/web-server-settings/id/your-domain-id-numberthen add like image below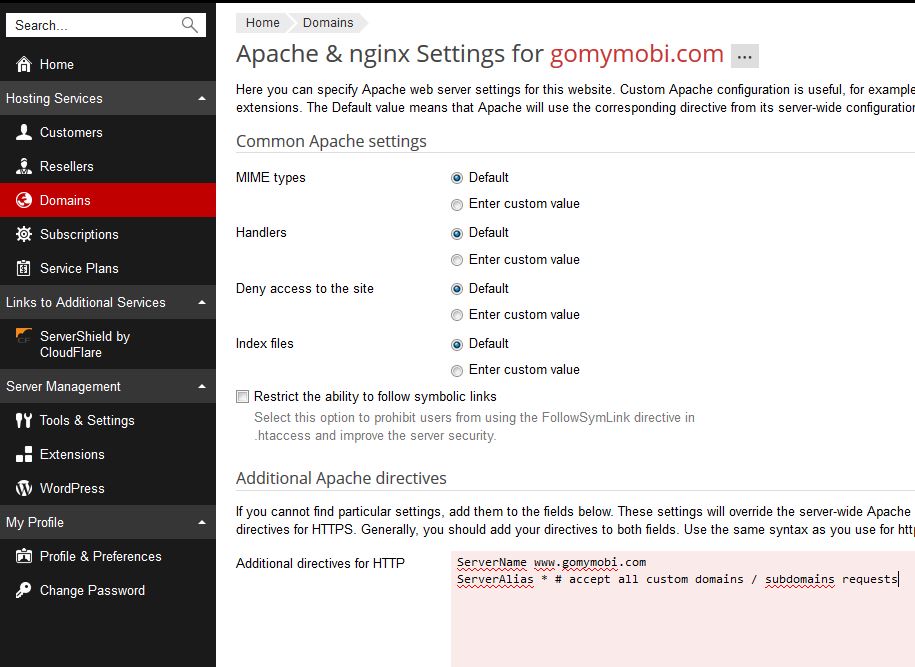
-
3. Restart web server
Go to this URL
https://your-server-ip-address:8443/admin/server/tools?context=toolsto restart web server.
-
1. Point all domains to your server
Go to this URL (replace by your domain information)
https://your-server-ip-address:2082/cpsessXXXXXXXXXX/frontend/paper_lantern/zoneedit/advanced.html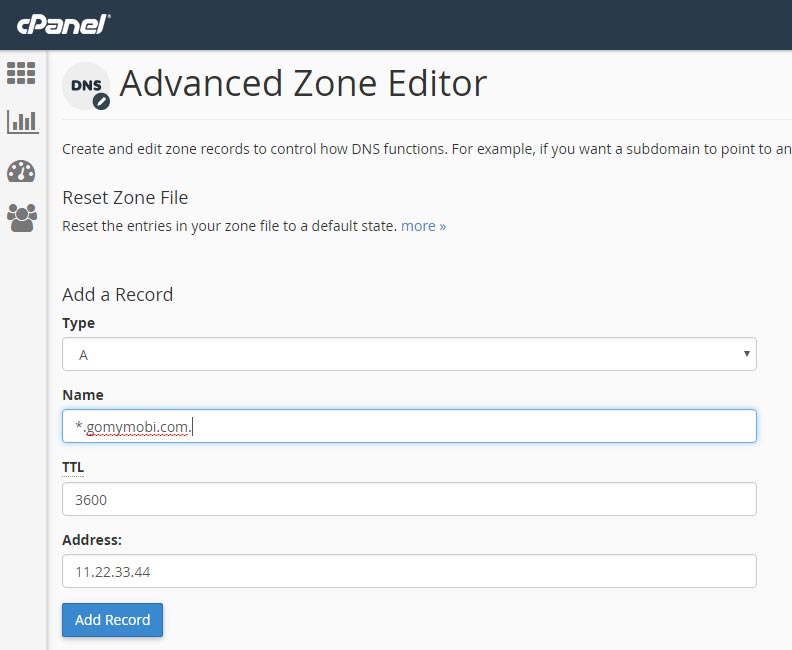
-
2. Include this wildcard in vhost configuring file
CAUTION can not perform this task via CPanel / WHM GUI because it always fails, you'll need to do via console's command line only. Read more about Modify Apache Virtual Hosts with Include Files
-
3. Restart web server
Go to this URL
https://your-server-ip-address:2087/cpsessXXXXXXXXXX/scripts/reshttpdto restart web server.
Software uses Paypal IPN to validate all user payments for orders, Paypal PDT is still be used but with many inconveniences.
VERY IMPORTANT: you must install module Gateway: Paypal to be able to process all user's payments.
Here's a quick guide to enable Paypal IPN in your Paypal My selling tools - Website Payment Preferences
- Switch to Instant Payment Notification (IPN)
- Point Notification URL to
http://www.your-domain-here.com/app/payments/ipn/ - Click button Turn On IPN to turn it on
Used to receive & validate user's payments automatically, or you'll need to handle client's payments manually. Please read documentation to enable PayPal PDT.
Here's a quick guide to register & use a PDT token, perform these below steps on your Paypal setting page - My selling tools - Website Payment Preferences
- Switch Auto Return to On
- Point Reurn URL to
http://www.your-domain-here.com/app/payments/order/ - Switch Payment Data Transfer to On
After saving these options, Paypal shall provide you a private PDT token at Payment Data Transfer section; in order to use, just copy & paste it to your System Settings.
VPS is required at least, for providing feature of custom domains. And in this section, there are 2 great VPS providers that we think you will love to use their service:
Digital Ocean
Only need to register a new account through above link then verify by your Paypal or credit card, you will get discount 10$. And you only need very little server resource to run software for best speed and performance, we only need a VPS with 1 CPU and RAM with 512 MB for this script perfectly.
So with this free 10$ from us, you will be able to use Digital Ocean for more than 2 months. Beside, you may also apply this code LOWENDBOX to get more 15$ discount.
Vultr
Like Digital Ocean, once you register a new account and verify by your Paypal or credit card, Vultr shall double your first deposit, and this special offer is valid for 12 months. This is best ever program for new members from Vultr.
By default, software supports SSL in back end, you only need to enable SSL in your server for the domain then all features will run on SSL protocol, you do not need to touch any settings. Therefore, all user clients that use subdomains also run on SSL protocol, in order to turn off, please go to System Settings.
However, almost SSL certificates are Domain Validation (DM) only, it means only your main domain is certified, all subdomains are not. In order to have all subdomains are sercured with SSL, you must use a Wildcard SSL certificate. Obviously, all Wildcard SSL certificates are not free or cheap, because this type of SSL certificate takes a lot of time and human resource to release and operate.
In this section, we will want to help you buy a afforable and trusting Wildcard SSL certificate that sold by professtional providers below. Certainly, probably you could find another provider for cheaper SSL, but we reviewed them carefully, and believe that they would give you the best SSL certificate and better support with the real cheap prices:
Highlight solutions from SSL certificates that you could buy:
- At least $100,000 USD Insurance Guarantee
- 99% Browser Compatibility
- Unlimited Subdomains
- 2048+ Bit SHA2 SSL/TLS Public Key Encryption
- Full Compatibility With All Versions of SSL and TLS
- Activates SSL Secure Site Seal
- 30 Day Unconditional Refund
The SSL Store
This provider is selling many SSL certificates from others, you may buy a Wildcard SSL certificate from:
By default, DingPost is installed with Development Mode is OFF, in order to enable this mode, please open "your/path/to/DingPost/app/common.php" and change $psz_app_in_dev to true.
With Development Mode is ON, there are few rules you should notice:
-
- All PHP errors displayed to all end users, and still logged into the file "errors.log"
-
- Many very important tasks are disabled, such as: change super administrative account's password & email
By default, DingPost uses PHP mail() function to send emails to users for tasks such as: new registrations, payments, password changes, etc.
But DingPost is also implemented PHPMailer as alternation. And it's super easy to set PHPMailer as default mailing function, by using your GMail or Yahoo Mail accounts. In order to perform this task, please follow these 2 very simple steps:
- Rename
/app/includes/PSZMailer.settings.php.configtoPSZMailer.settings.php, then open this renamed PHP file. -
Fill your account details into
$PSZMailer_settingthen Save changes
<?php
$PSZMailer_setting = array(
'username' => '[email protected]',
'password' => 'your-password'
);
?>
- From now, all emails will be sent by your GMail / Yahoo Mail account by default.
CAUTION you'll need to switch "Less secure apps" to ON if you're using GMail.
By default, DingPost displays the dropdown select of supported languages on both frontpage (homepage) and application page. In order to add / remove a supported language, please open "your/path/to/DingPost/app/common.php" & edit variable $PSZ_APP_LANGUAGES
Install DingPost
Because DingPost is a PHP script, so we need an already installed PHP web-host that working well. Basically, you'll need the information below to setup DingPost:
- A MySQL database name with Collation should be set as Unicode (utf8_unicode_ci)
- A database user with password that can work on the database above
- An email for admin account
To get started, you only need to upload the extracted directory of DingPost to your site host and on browser just go to install page, enter all required fields to start installing.
CAUTION if you install DingPost on a shared host, please contact your web-host provider for FTP upload information or MySQL database issues.
Local Development / Test
It's better & faster to test DingPost on local machine enviroments. This section guides you how to create an enviroment that may run DingPost look like a real live system. In this tutorial, we may only give you the instructions to create a system on Windows OS and we also assume your desired domain is yourdomain.com. For other OS, please find different solutions, it's also very easy.
Basically, you may use any package that you're fimiliar with; it only needs to pass Requirments. In this tutorial, we suggests XAMPP, certainly you may also download the latest version, but stable version 5.6 is recommended. This package comes with all required softwares: Apache, PHP & MySQL.
After downloading & installing XAMPP successfully (we assume you installed to C:\xampp\), without errors. Please go to next step.
CAUTION for any errors, please Google it, we can not give exacted solution because of your computer.
You need administrative permission to edit the hosts file C:\Windows\System32\drivers\etc\hosts. But we recommend this tool - BlueLife Hosts Editor - to edit quickly. Please download & verify its checksum to prevent any harm.
Run this tool with administrative permission, then add a record for domain you want to run with this script. You may choose any IP address. After added this record, Save it then close.

CAUTION purpose of this step is pointing your desired domain to local IP on your computer, next step we'll assign a site with this domain on your local server.
1) Open Apache vhost configuration file C:\xampp\apache\conf\extra\httpd-vhosts.conf, add code below to end of file then save. Use the same IP address & desired domain you declared in above step.
<VirtualHost 127.0.0.20>
DocumentRoot c:/xampp/htdocs/yourdomain.com
ServerName www.yourdomain.com
ServerAlias *
</VirtualHost>
2) Unzip all files in folder source_files to C:\xampp\htdocs\yourdomain.com\. If this folder is not exist, create it first.
3) Must restart Apache to apply new settings, by using the tool - C:\xampp\xampp-control.exe.
Type your desired domain yourdomain.com into browser's address bar then start installation to test.
How it work
- Browser uses your hosts file
C:\Windows\System32\drivers\etc\hoststo resolve this domain first - Found this domain with IP of server that contains this site, then send request to server (your local machine)
- Your local server (XAMPP) receives request, use
httpd-vhosts.confto check if this IP address is hosting on server - Found this IP address is listening, and hosted on server, start serving all requests
- Done
Localization
DingPost's Localization is really very simple & easy. You even do not need any tool except a text editor, because DingPost uses PHP language files for showing the text. DingPost has a default language file (en.php) in languages directory, you only need to translate all strings to other languages easily & quickly.
For more new other strings, it's also easy, just follow our instructions in DingPost's Multilingual support to manage DingPost's languages better.
SPECIAL you just put the translated language PHP file into the languages directory, the platofrm shall care the rest.
Cronjob Setup
In order to run all scheduled posts, cronjobs must be configured on your hosting. You will need to setup cronjob that called every minute with below command:
wget -q --spider https://www.yourdomain.com/app/publish/